· Updated on
Ditch Passwords: Secure Your VPS with SSH Keys
We move beyond complex passwords and harden SSH access using ed25519 keys, proper permissions, and cloud-init overrides.
Last time we covered how to enhance VPS security by creating regular users and changing passwords to more complex ones. Here’s an image for reference:
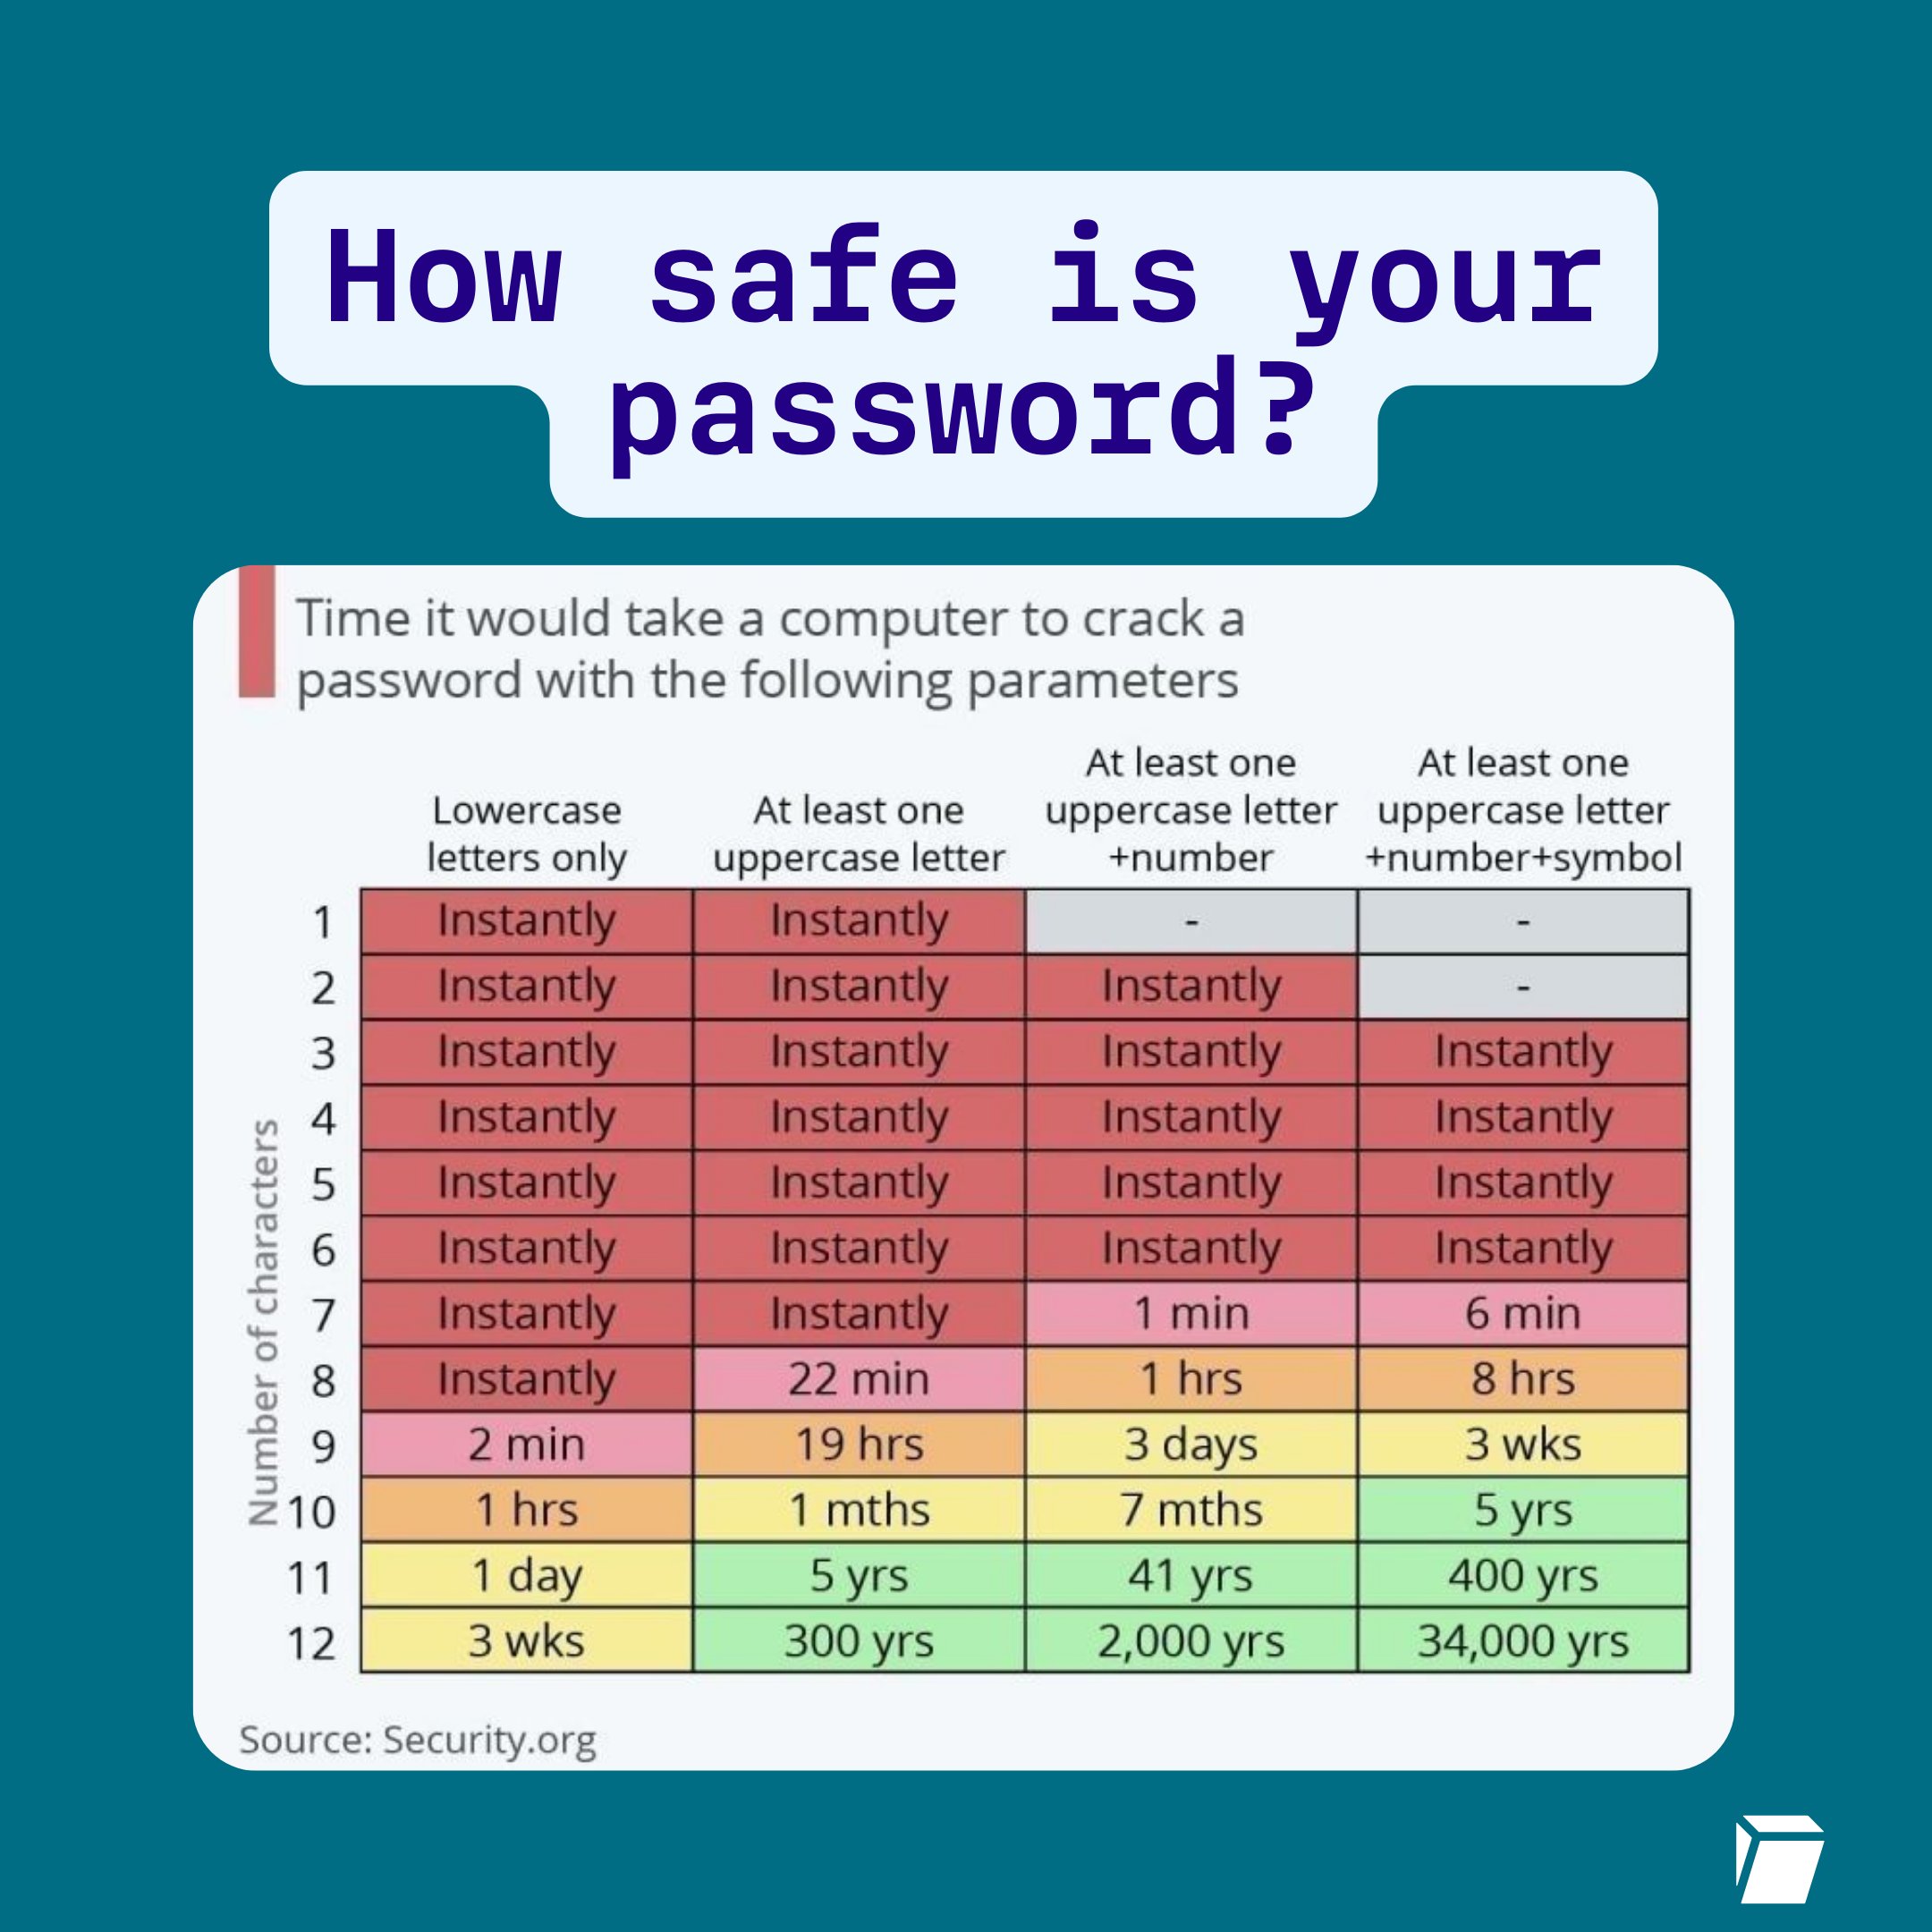
But is a password the most secure option? Not necessarily. Because even if your password is long and complex, password-based SSH logins still suffer from a few fundamental problems:
- They can be brute-forced (even if it’s unlikely, attackers will try constantly).
- They rely on something you type, which means they can be phished, logged, or reused.
- They expand the attack surface, you’re leaving a whole authentication method enabled on the server.
The better approach is:
🔐 Use SSH keys and disable password logins completely.
This article documents the full journey: generating a strong key pair on macOS (or on whatever system you want), installing the key correctly on the server, fixing permission issues, and (most importantly) handling the tricky part, cloud-init overriding your SSH config.
Why SSH Keys are Better than Passwords
SSH keys are essentially cryptographic credentials. Instead of “something you know” (password), SSH keys rely on:
- a private key (kept on your machine)
- a public key (stored on your server)
- optional passphrase protection for the private key
Benefits
- Extremely resistant to brute force
- No password guessing over the network
- You can lock down access to key-only authentication
- You can manage multiple keys and revoke them cleanly
Step 1: Generate an ed25519 SSH Key
We used this command:
ssh-keygen -t ed25519 -a 100What does -a 100 mean?
-a controls the number of key derivation rounds used to protect your private key when you set a passphrase.
More rounds = harder to brute-force the passphrase if your private key is stolen.
Where does the key go?
On macOS, if you press Enter when asked for a file path, the key will be stored in:
~/.ssh/id_ed25519(private key)~/.ssh/id_ed25519.pub(public key)
You can use -f to specify a file path.
Step 2: Should You Use a Passphrase?
During the generation process, you will be asked if you want to set up a passphrase for your key. In most situations, the answer is
Yes. Highly recommended.
If your laptop is compromised and your private key is stolen:
- without passphrase: attacker gets instant access
- with passphrase: attacker must brute-force it offline (very expensive)
If convenience is a concern, macOS can store the passphrase via Keychain so you don’t type it every time.
For the simplest way, you can also leave it empty.
Step 3: Put the Public Key on the VPS (Correct Location)
This is where many people get confused (including me).
Important concept
Your public key file name on your Mac can be anything, like id_ed25519.pub.
But on an Ubuntu VPS, SSH expects keys to be listed inside:
~/.ssh/authorized_keysThat means for user ubuntu, the path is:
/home/ubuntu/.ssh/authorized_keysUse this if there’s no .ssh/ folder
mkdir -p ~/.sshSimply placing the id_ed25519.pub file in the .ssh/ folder will not work.
According to the official documentation,
Option A (recommended): ssh-copy-id
ssh-copy-id ubuntu@your-vpsOption B: manual copy
On your local machine:
cat ~/.ssh/id_ed25519.pubCopy the output, then on the VPS:
mkdir -p ~/.ssh
nano ~/.ssh/authorized_keys
Paste the key on a new line.
Step 4: Fix Permissions (Why chmod 700 and chmod 600?)
SSH is strict about file permissions for good reason.
If .ssh or authorized_keys is accessible or writable by others, SSH assumes it could be tampered with and may ignore it.
Run these on the VPS:
chmod 700 ~/.ssh
chmod 600 ~/.ssh/authorized_keys
chown -R $USER:$USER ~/.ssh
✅ If above cmd show no output: that’s normal. Silent success is expected.
To verify:
ls -ld ~/.ssh
ls -l ~/.ssh/authorized_keys
Expected:
drwx------ 2 ubuntu ubuntu ... .ssh
-rw------- 1 ubuntu ubuntu ... authorized_keys
Step 5: Confirm Key Login Works First
Before disabling passwords, always test key login in a new terminal:
ssh ubuntu@your-vpsIf it logs in without asking for the VPS password (it may ask your key passphrase), you’re ready.
Keep your current SSH session open during testing so you don’t lock yourself out.
Step 6: Disable Password Login (And It Didn’t Work at First)
After editing /etc/ssh/sshd_config and adding:
PasswordAuthentication no
PermitRootLogin no
PubkeyAuthentication yes
KbdInteractiveAuthentication no
I restarted SSH and even restarted ssh.socket.
But password login still worked.
The truth came from
sudo sshd -T | grep passwordauthenticationIt showed:
passwordauthentication yesEven though my config file clearly said no.
So what happened?
The Real Issue: RackNerd 50-cloud-init.conf Overriding Your Config
On RackNerd Ubuntu VPS templates, the SSH config often includes a directive at line 1 without a # comment:
Include /etc/ssh/sshd_config.d/*.confAnd inside that folder I found:
/etc/ssh/sshd_config.d/50-cloud-init.confThat file had:
PasswordAuthentication yesHere is the catch with OpenSSH: for each keyword, the first obtained value wins.
Because Include /etc/ssh/sshd_config.d/*.conf is at line 1 of Ubuntu’s default /etc/ssh/sshd_config, OpenSSH parsed 50-cloud-init.conf before reading the rest of /etc/ssh/sshd_config. Since it encountered PasswordAuthentication yes first, it completely ignored the no in the main config!
✅ Fix: change it to:
PasswordAuthentication noThen restart SSH (e.g., sudo systemctl restart ssh on Ubuntu 22.04, or sudo systemctl restart ssh.socket on Ubuntu 24.04).
After that, password login stopped working.
Step 7: Make It Future-Proof (Recommended)
Cloud-init can regenerate or overwrite 50-cloud-init.conf during system updates or re-provisioning.
Because OpenSSH uses first match wins and loads drop-in files in alphabetical order, we want our custom configuration to load before 50-cloud-init.conf.
We do this by creating a drop-in file with a lower number prefix like 01-:
sudo tee /etc/ssh/sshd_config.d/01-hardening.conf >/dev/null <<'EOF'
PasswordAuthentication no
KbdInteractiveAuthentication no
PermitRootLogin no
PubkeyAuthentication yes
EOF
Because 01-hardening.conf is loaded alphabetically before 50-cloud-init.conf, its rules take priority even if cloud-init resets 50-cloud-init.conf in the future.
Test syntax before restarting
Before restarting the SSH service, always test your configuration syntax first:
sudo sshd -t- No output: That’s good! Silent success means the configuration has no syntax errors.
Restart SSH service
Once verified, apply the changes by restarting the SSH service. The command depends on your distribution version:
-
Ubuntu 24.04 LTS (uses systemd socket activation by default):
sudo systemctl restart ssh.socket -
Ubuntu 22.04 LTS / Debian / older systems (uses classic standalone service):
sudo systemctl restart ssh
💡 Tip: If you’re unsure which init mode your server uses, you can run:
sudo systemctl restart ssh 2>/dev/null || sudo systemctl restart ssh.socket
Step 8: Verify Password Login Is Truly Disabled
On the VPS, check:
sudo sshd -T | grep -E 'passwordauthentication|permitrootlogin|pubkeyauthentication|kbdinteractiveauthentication'Expected output includes:
permitrootlogin no
pubkeyauthentication yes
passwordauthentication no
kbdinteractiveauthentication no
Bonus Hardening (Optional)
Install fail2ban
It reduces brute-force noise and bans abusive IPs automatically.
sudo apt update
sudo apt install -y fail2ban
sudo systemctl enable --now fail2ban
Disable X11 forwarding if you don’t need it
In sshd_config:
X11Forwarding noLess attack surface is always better.
For Further Hardening
- firewall setup
- automatic security upgrades
- monitoring login attempts
- restricting SSH access by IP or using VPN
- adding 2FA
- Secure DNS