Feb 4, 2026 · Updated on Mar 7, 2026
How to Remove EXIF Metadata from Images on macOS
Scrubbing EXIF data ensures your privacy by hiding sensitive location and time data, while also providing anonymity by removing the digital fingerprints that link the photo back to you.
Have you ever considered that your photo might contain more information than you could imagine? The information contained within a photo or image extends far beyond what meets the eye, and a lot of that data leaks through EXIF.
EXIF data (Exchangeable Image File Format), is metadata embedded in digital images and videos that records detailed technical and contextual information about how and when the media was created. It can contain camera and equipment details, shooting settings, temporal information, geolocation data, image characteristics, software and processing info, copyright and ownership, and so on, you will be surprised how much metadata can be embedded into a single image.
If such photos or images are only sitting on your local hard drive, it’s not a big deal. But right after you want to share them on the internet, such as posting them on your personal blog or social media, that’s where bad things can happen. Although most major social media platforms, like Instagram or X, automatically strip EXIF data when you upload, that also means they can access your metadata, refine your user profile to deliver targeted advertising, or sell your personal information to third parties if they want to (and trust me, they will).
The worst situation is when you send an image to a forum, a comment section, or an online public storage service that most likely doesn’t have the functionality to scrub metadata and allows everyone to download the original file. Then you are in big trouble. Strangers can use this information to track you to your workplace, the parks where you feed pigeons, or even to your home. Just imagine how scary that would be.
That’s why you need to make sure every piece of data inside a photo or image is wiped out before it reaches the internet. This blog will guide you on how to easily scrub all the EXIF metadata from an image on macOS, using ExifTool by Phil Harvey and the built-in Shortcuts app. By the end of this tutorial, you will be able to scrub an image with just one click.
Step 0: Install ExifTool
First, we need to install ExifTool on the device. If you don’t have Homebrew on your Mac, install it using the following command:
1. Install Homebrew
/bin/bash -c "$(curl -fsSL https://raw.githubusercontent.com/Homebrew/install/HEAD/install.sh)"2. Install ExifTool
Open your Terminal and run the following command:
brew install exiftoolStep 1: Create a New Shortcut
- Open the Shortcuts app on your Mac.
- Click the + (plus) icon to create a new shortcut.
- In the right-hand sidebar, click the Shortcut Details icon (the small “i” in a circle) and check the box “Use as Quick Action”.
- Check the box for “Finder” under the Quick Action settings.
- At the very top of the main window, change the input to: “Receive Image from Quick Actions.”
Step 2: Add the Shell Script
- Search for the “Run Shell Script” action in the right sidebar and drag it into your shortcut.
By default, macOS disables scripting actions for security to prevent untrusted scripts from running automatically. You just need to flip a single toggle in the Shortcuts app settings:
- Go to the menu bar and select Shortcuts > Settings.
- Click on the Advanced tab.
- Check the box that says Allow Running Scripts.
- Set the Shell to
/bin/zsh. - Set Pass Input to “as arguments”.
- Paste the following script:
EXIFTOOL="/opt/homebrew/bin/exiftool"

# 0. Trigger macOS permission prompt
osascript -e "tell application \"Finder\" to duplicate file POSIX file \"$1\" to POSIX file \"/tmp/\" with replacing" > /dev/null 2>&1 &
OSPID=$!

# 1. Wait until permission is granted (retries every second, up to 30s)
RETRY=0
while [ $RETRY -lt 30 ]; do
    RESULT=$($EXIFTOOL -all= -overwrite_original "$1" 2>&1)
    if ! echo "$RESULT" | grep -q "Error opening file"; then
        break
    fi
    sleep 1
    RETRY=$((RETRY + 1))
done

# 2. Clean up the background trigger
kill $OSPID 2>/dev/null
wait $OSPID 2>/dev/null
rm -f "/tmp/$(basename "$1")" > /dev/null 2>&1
echo "$RESULT"

# 3. Process remaining files and show results
for f in "$@"
do
    if [ "$f" != "$1" ]; then
        $EXIFTOOL -all= -overwrite_original "$f"
    fi

    echo "--- FILE: $(basename "$f") ---"
    $EXIFTOOL "$f"
    echo ""
done
Note: This is for the standard Apple Silicon Homebrew path. On an older Intel Mac, change the first line to
EXIFTOOL="/usr/local/bin/exiftool". You can always verify your path by typingwhere exiftoolin Terminal.
What does the
osascriptline do? macOS’s Shortcuts sandbox silently blocks command-line tools like ExifTool from accessing files in protected folders (Downloads, Desktop, Documents). This clever one-liner asks Finder to touch the file via AppleScript, which forces macOS to show a permission prompt. The first time you run the shortcut, a dialog will appear asking “Finder.app” would like to access files in your Downloads folder. Click Allow, and the script will automatically retry and succeed. This only happens once — all future runs will work instantly.
Step 3: Add the Pop-Up Notification
Since a shell script runs in the background, you won’t see the output unless we tell Shortcuts to display it.
- In the right sidebar, search for the “Show Content” action.
- Drag it under your Shell Script action.
- It should automatically use the “Shell Script Result” as the alert message.
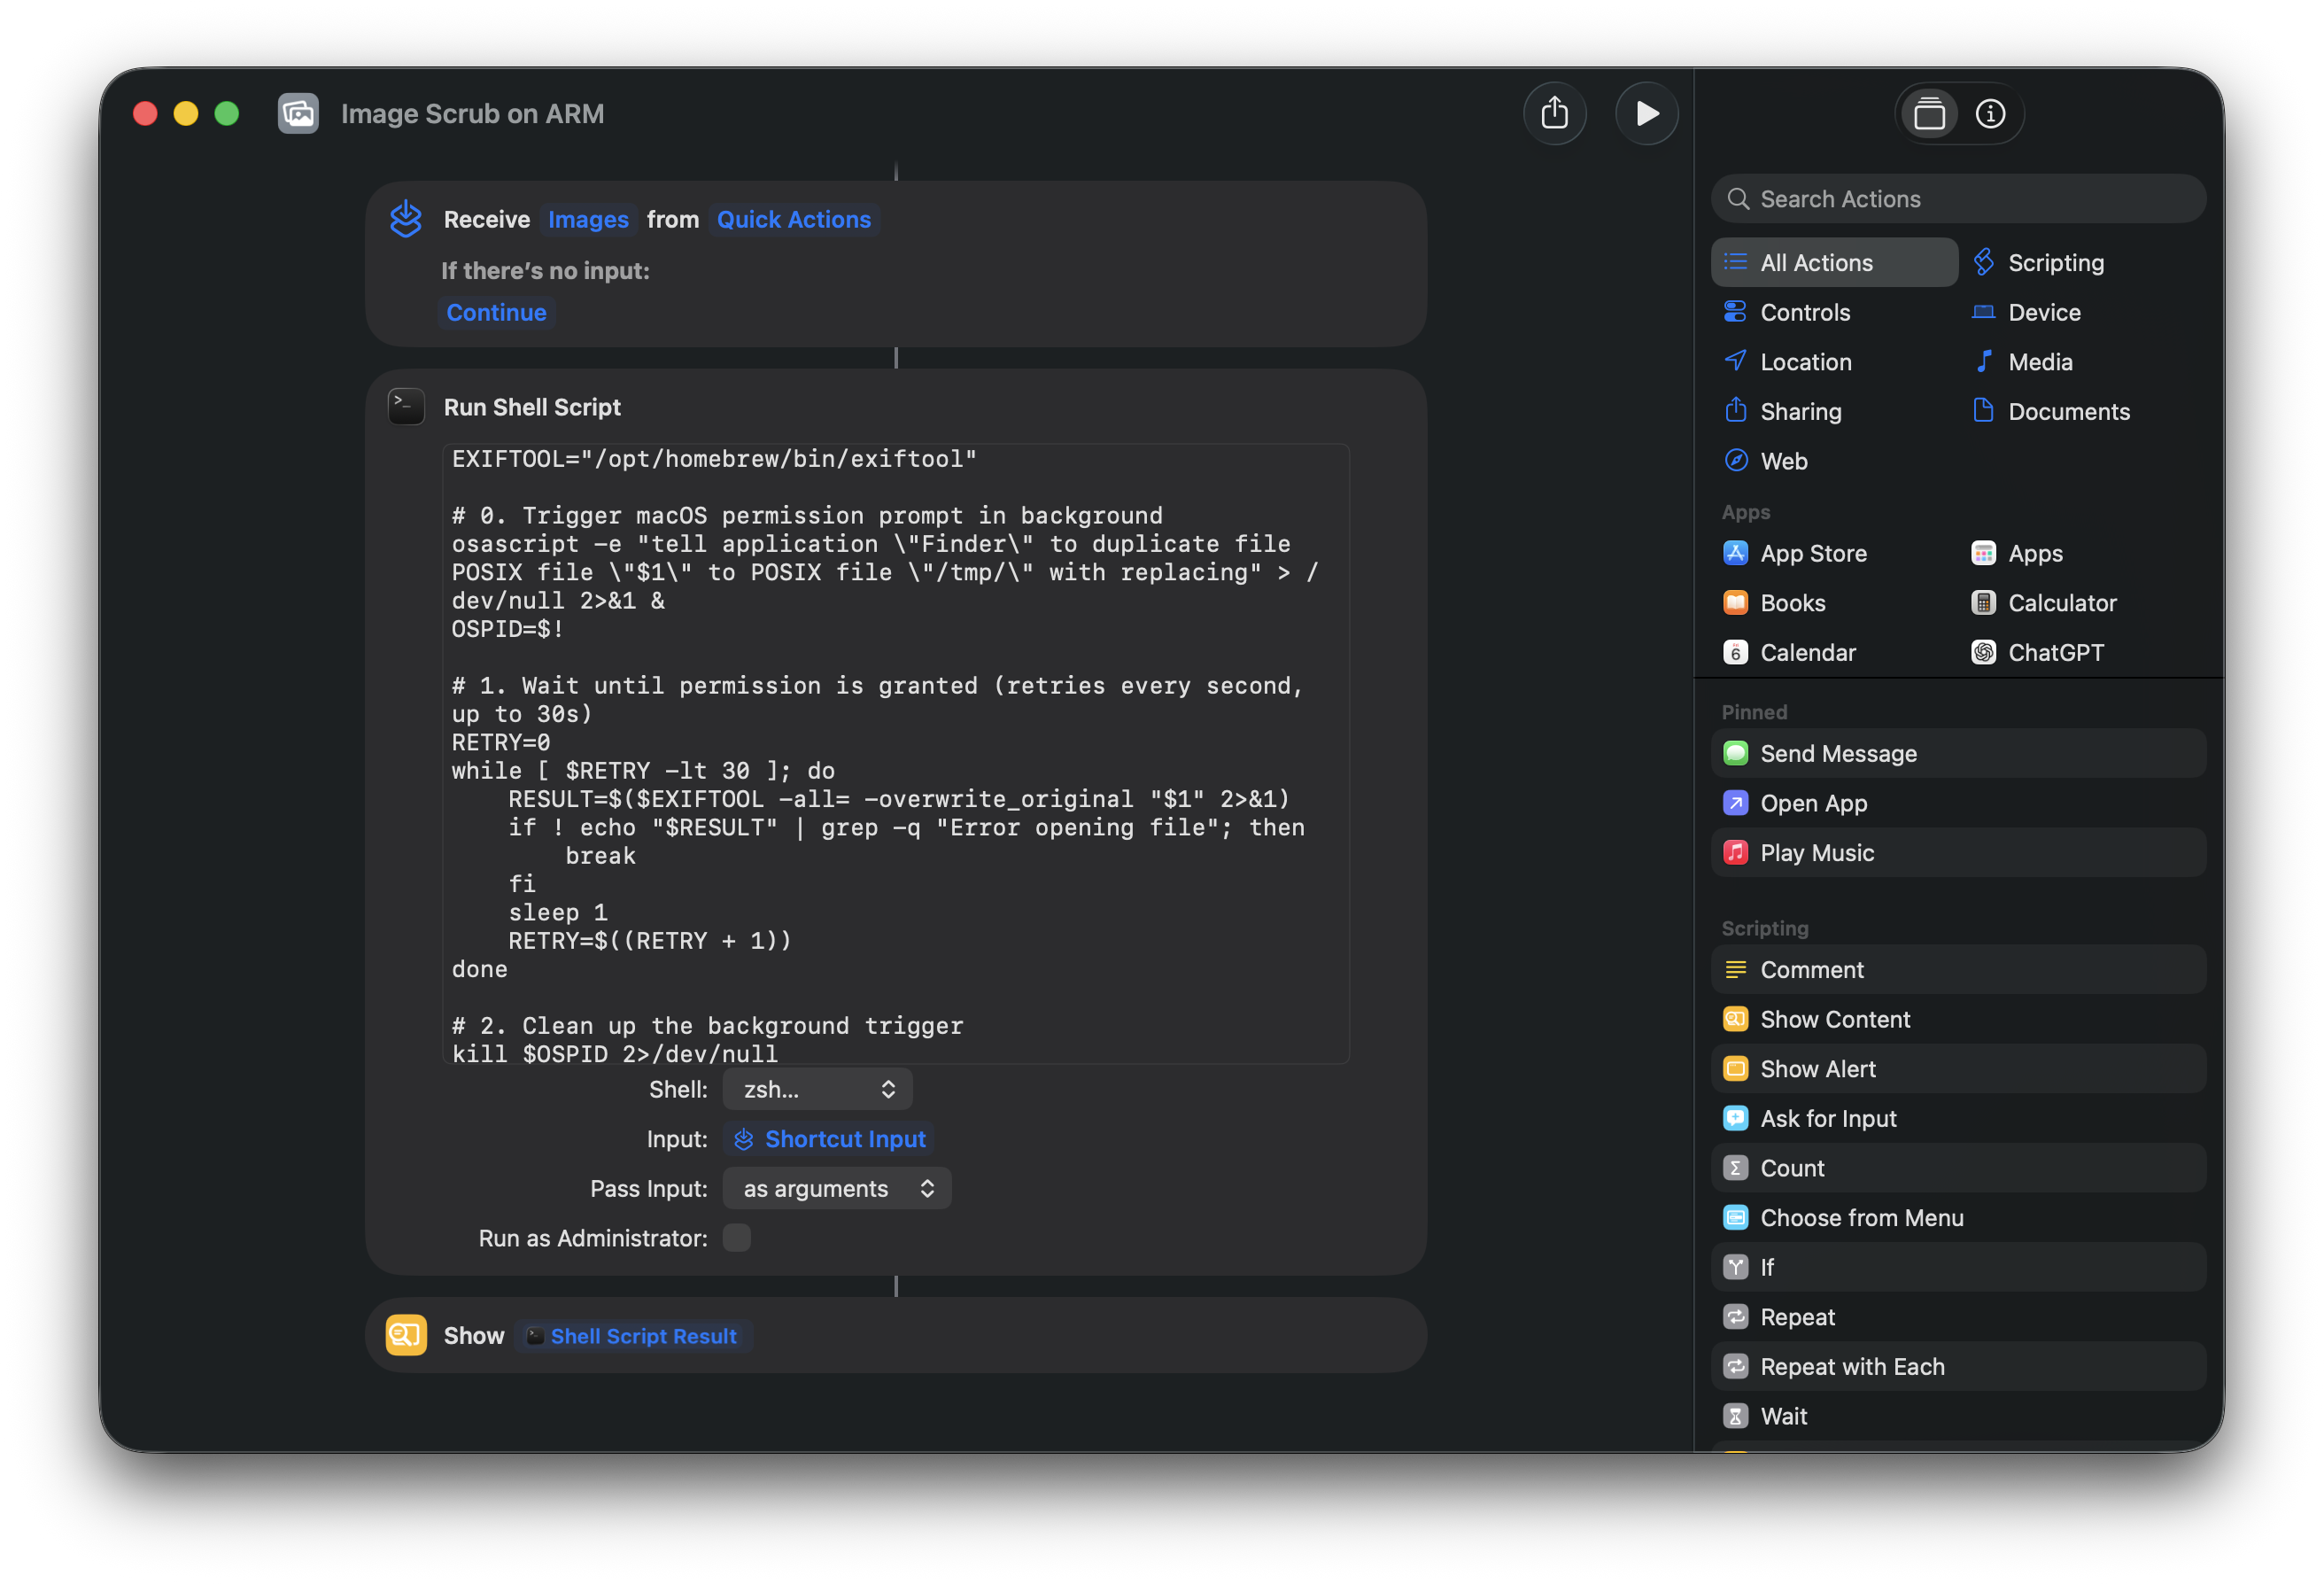
Name it something clear like “Image Scrub”. Shortcuts auto-saves, so you can just close the window. It should look like this:
Step 4: Test it Out!
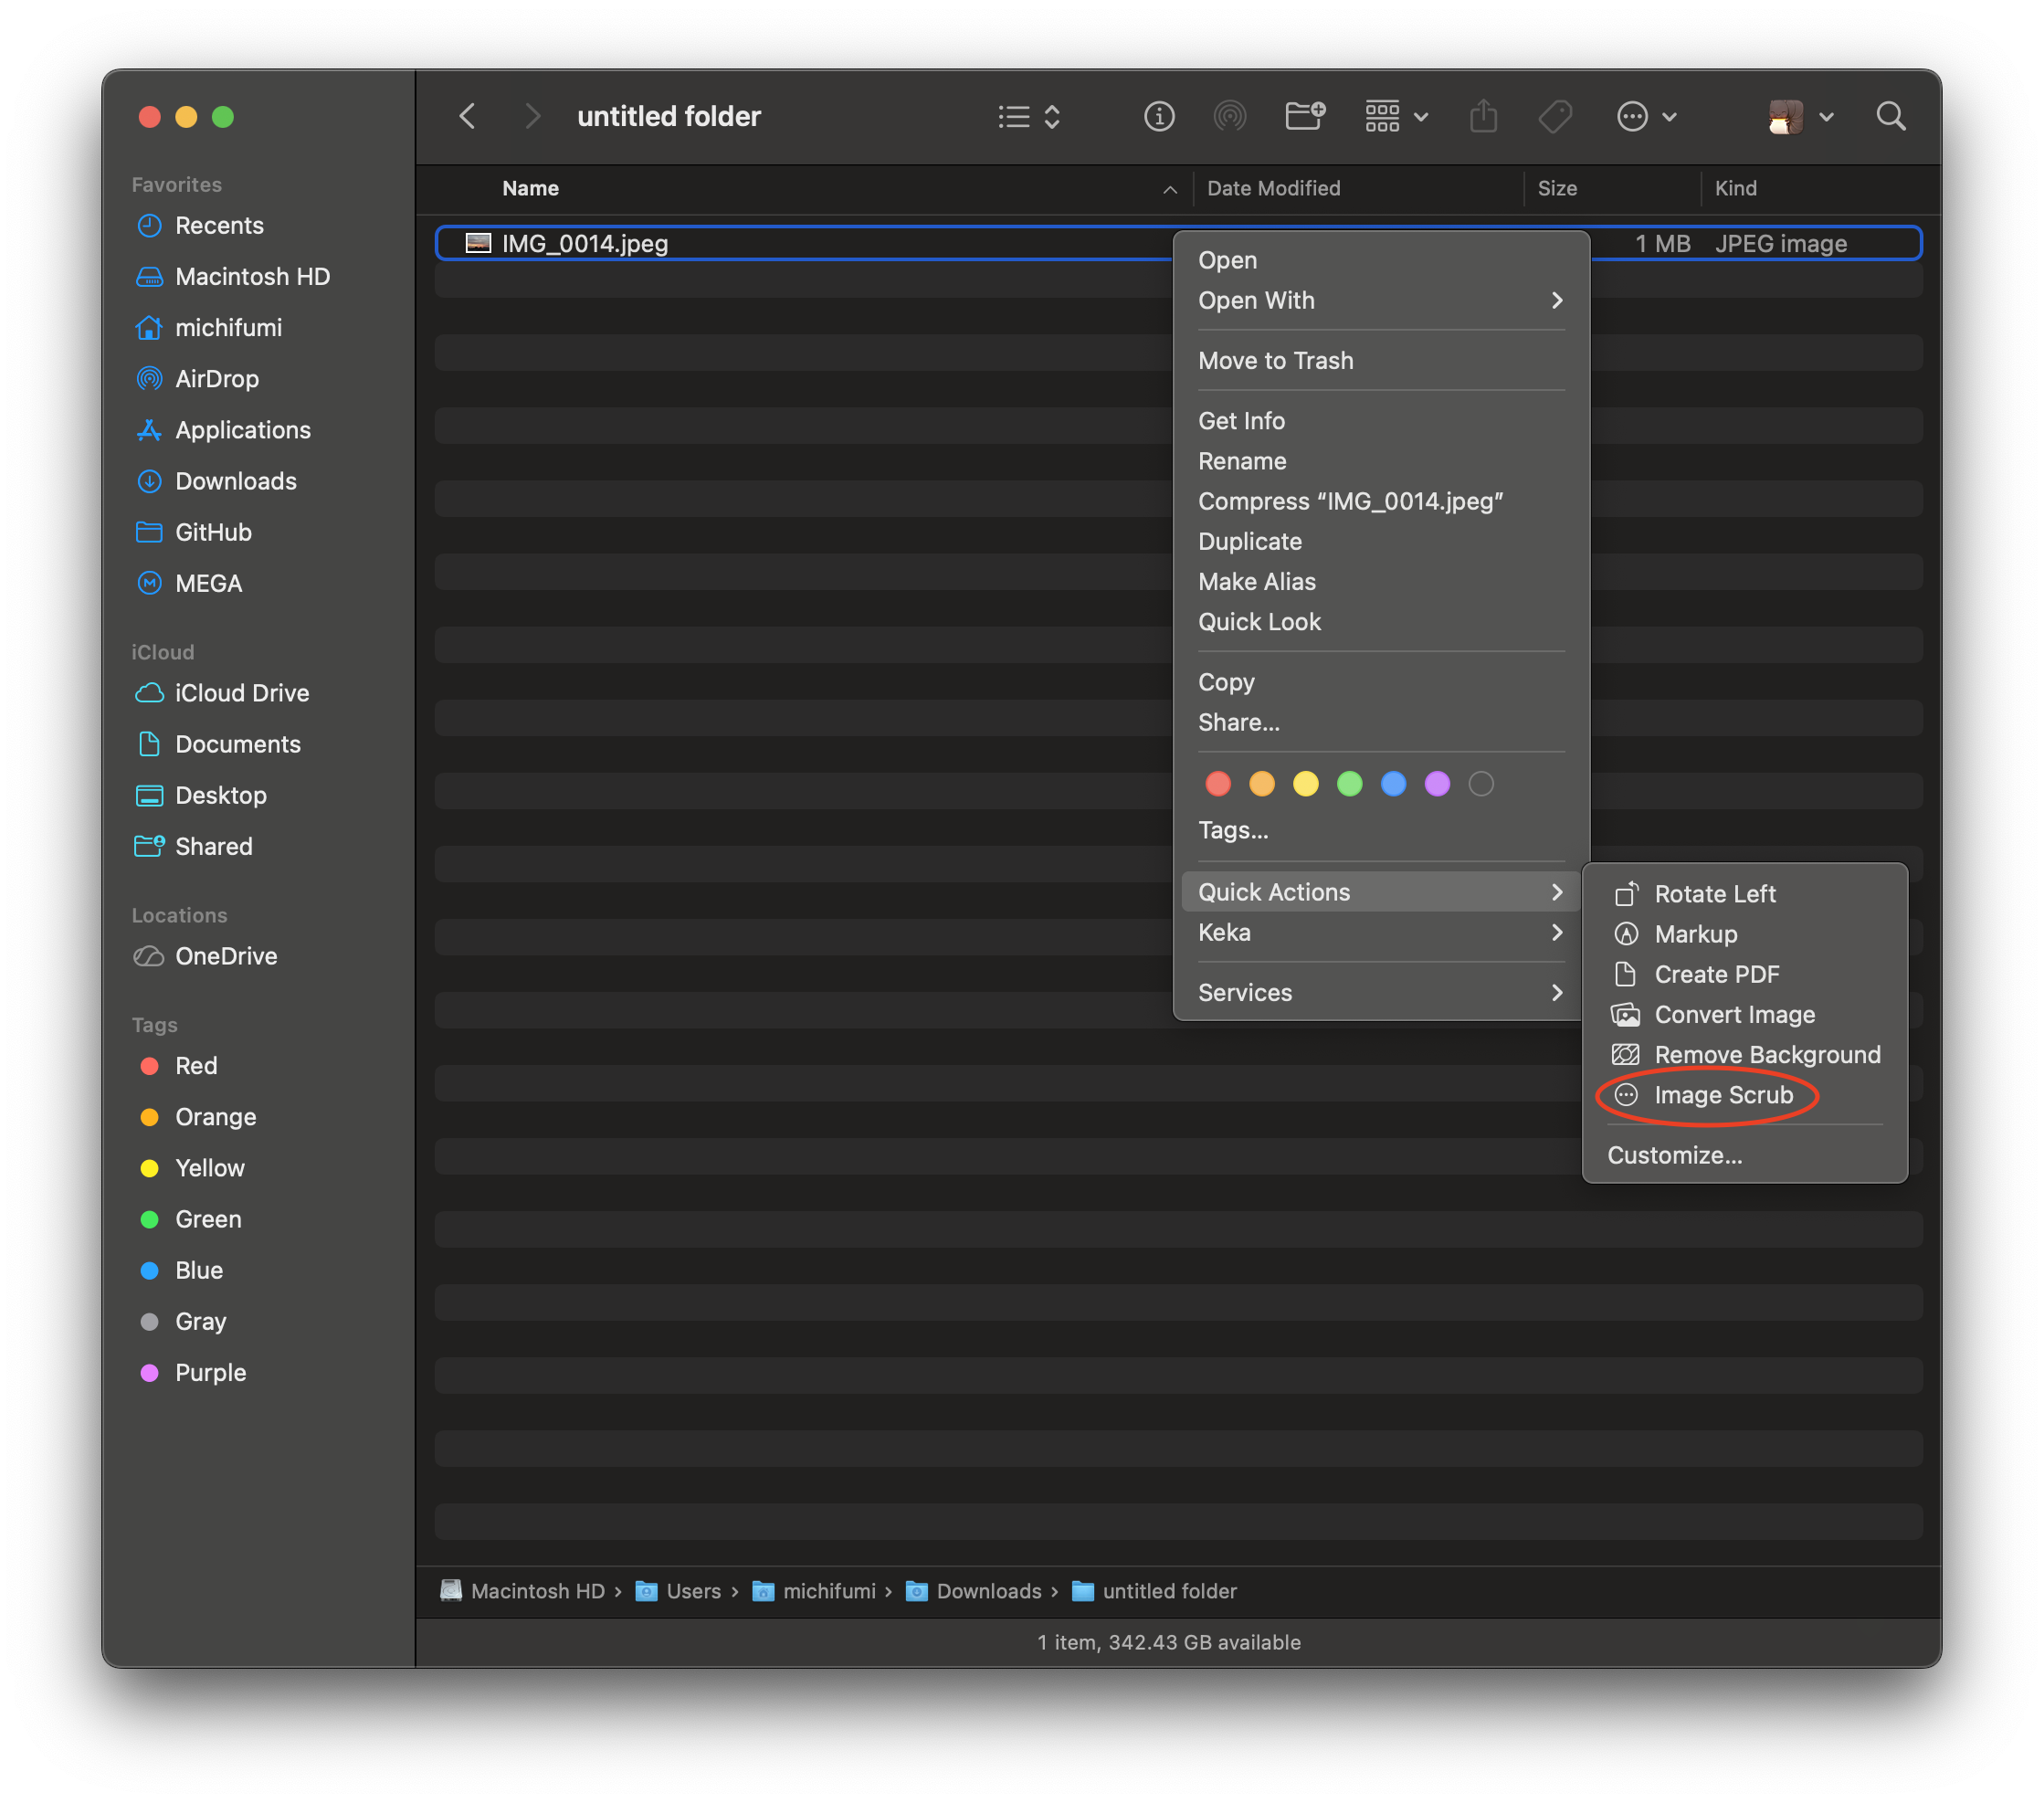
- Go to any folder in Finder.
- Right-click an image that you already have a backup copy of.
- Go to Quick Actions > Image Scrub.
First-time only: A permission dialog will appear asking “Finder.app” would like to access files in your Downloads folder (or whichever folder you’re in). Click Allow. The script will wait for you and then proceed automatically. This only happens once per folder.
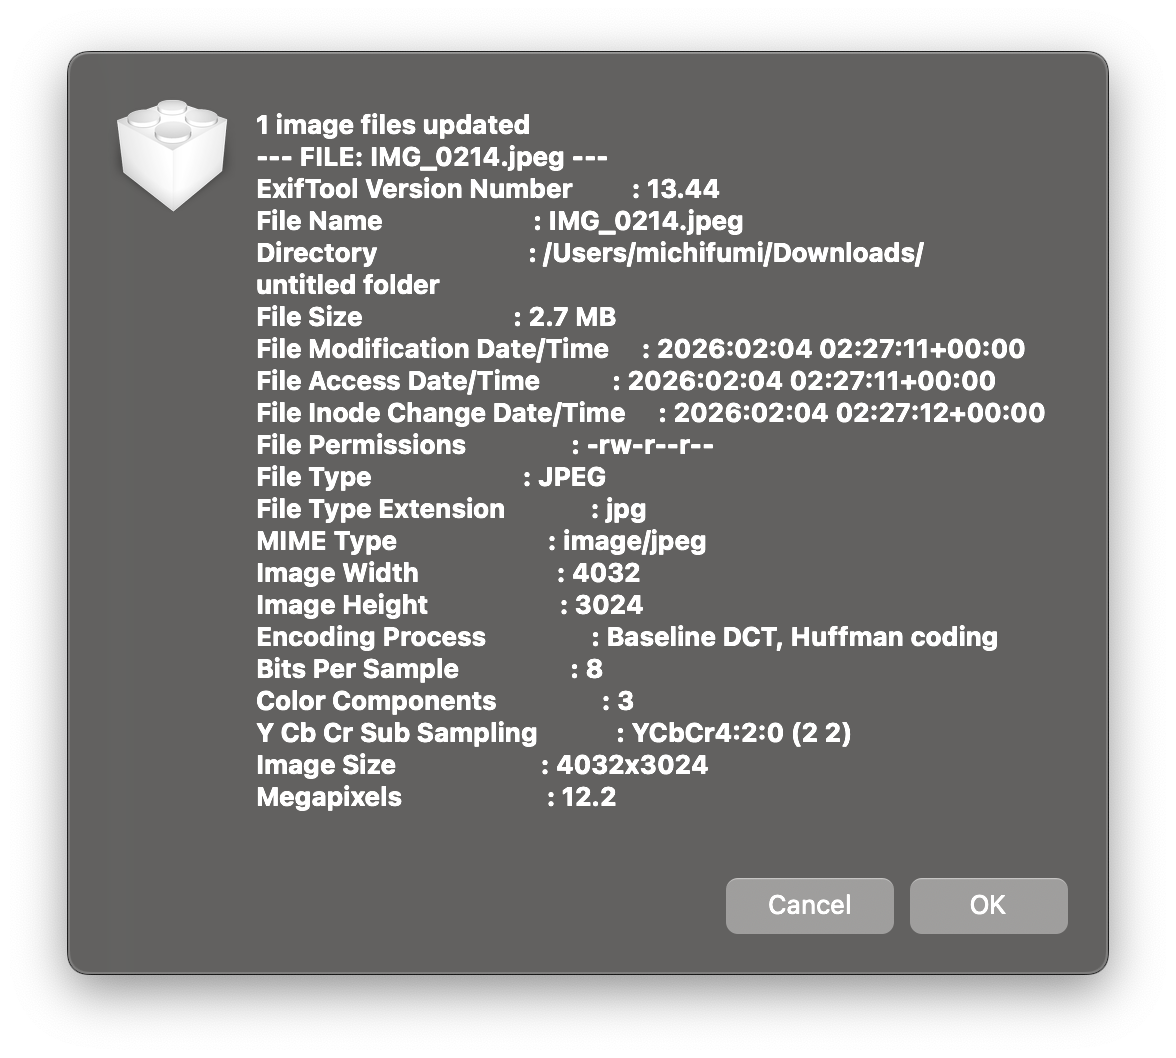
A dialog box will appear showing you the “cleaned” metadata (which should now only show basic file system properties like file size and format, like below).
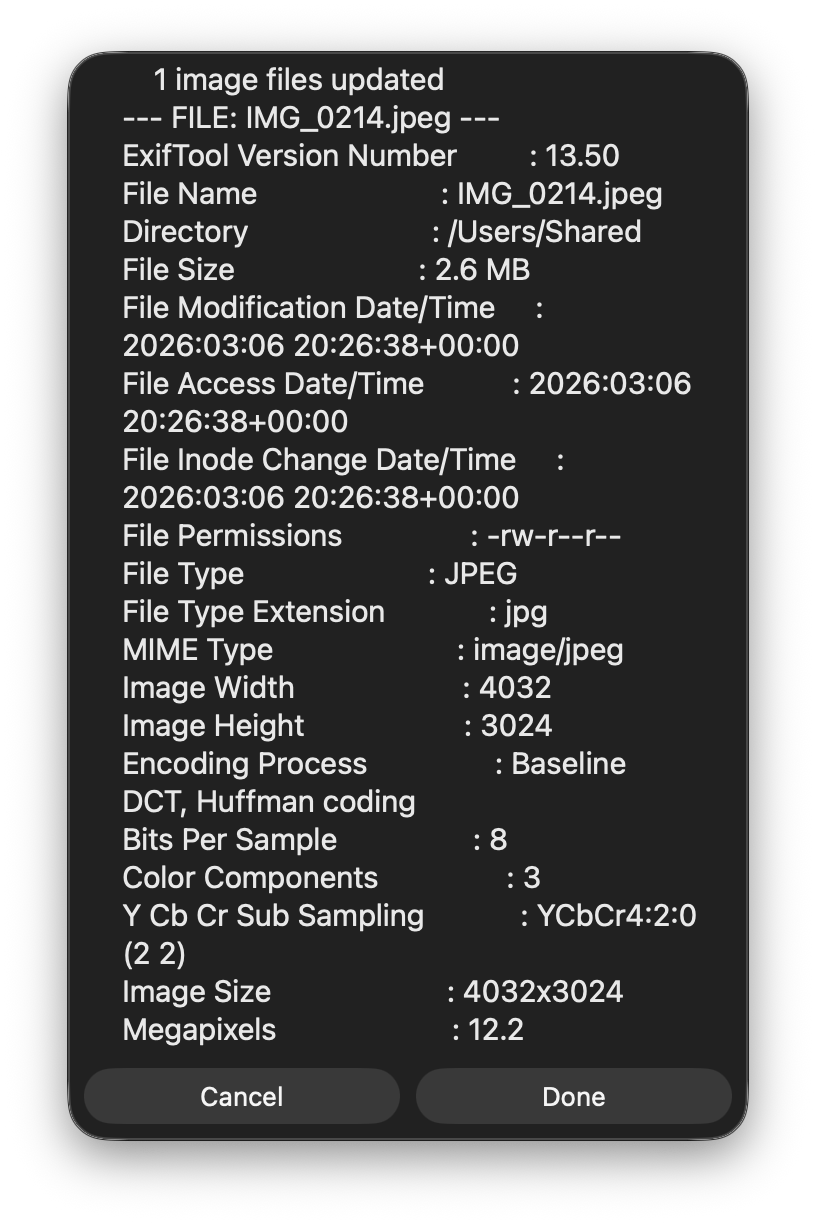
You can now upload this image to the internet without any metadata that could be used to track you.
Legacy Method: Automator
If you are using an older version of macOS that does not support Shortcuts, or you don’t want to deal with the wired permission issue with Shortcuts because its sandbox protection, you can still accomplish this using the legacy Automator app.
Step 1: Find and Open Automator
Press Cmd + Space and type Automator, then hit Enter.
Select New Document.
Choose Quick Action as the document type and click Choose.
Step 2: Configure the Inputs
At the very top of the workflow area, set the following:
- Workflow receives current:
image files - in:
Finder
Step 3: Add the Shell Script
In the search bar on the left, type “Run Shell Script”.
Drag that action into the main workflow area on the right.
Change Pass input: to as arguments.
Clear out the default text and paste the following script:
EXIFTOOL="/usr/local/bin/exiftool"

for f in "$@"
do
    # 1. Strip all metadata in-place
    $EXIFTOOL -all= -overwrite_original "$f"

    # 2. Extract remaining info for the pop-up
    echo "--- FILE: $(basename "$f") ---"
    $EXIFTOOL "$f"
    echo ""
done
Warning: I recommend changing the first line that sets the EXIFTOOL path to the path shown by which exiftool in Terminal. This path may vary depending on the macOS version or hardware.
Step 4: Add the Display Notification
Since a shell script runs in the background, you won’t see the output unless we pipe it to a window.
In the search bar on the left, type “Set Value of Variable”. Drag it under your script.
Click the “Variable:” dropdown, select New Variable…, and name it metadata_output.
Now, search for “Ask for Confirmation” and drag it to the bottom.
Drag the Variable named metadata_output in the Message box.
Step 5: Save and Run
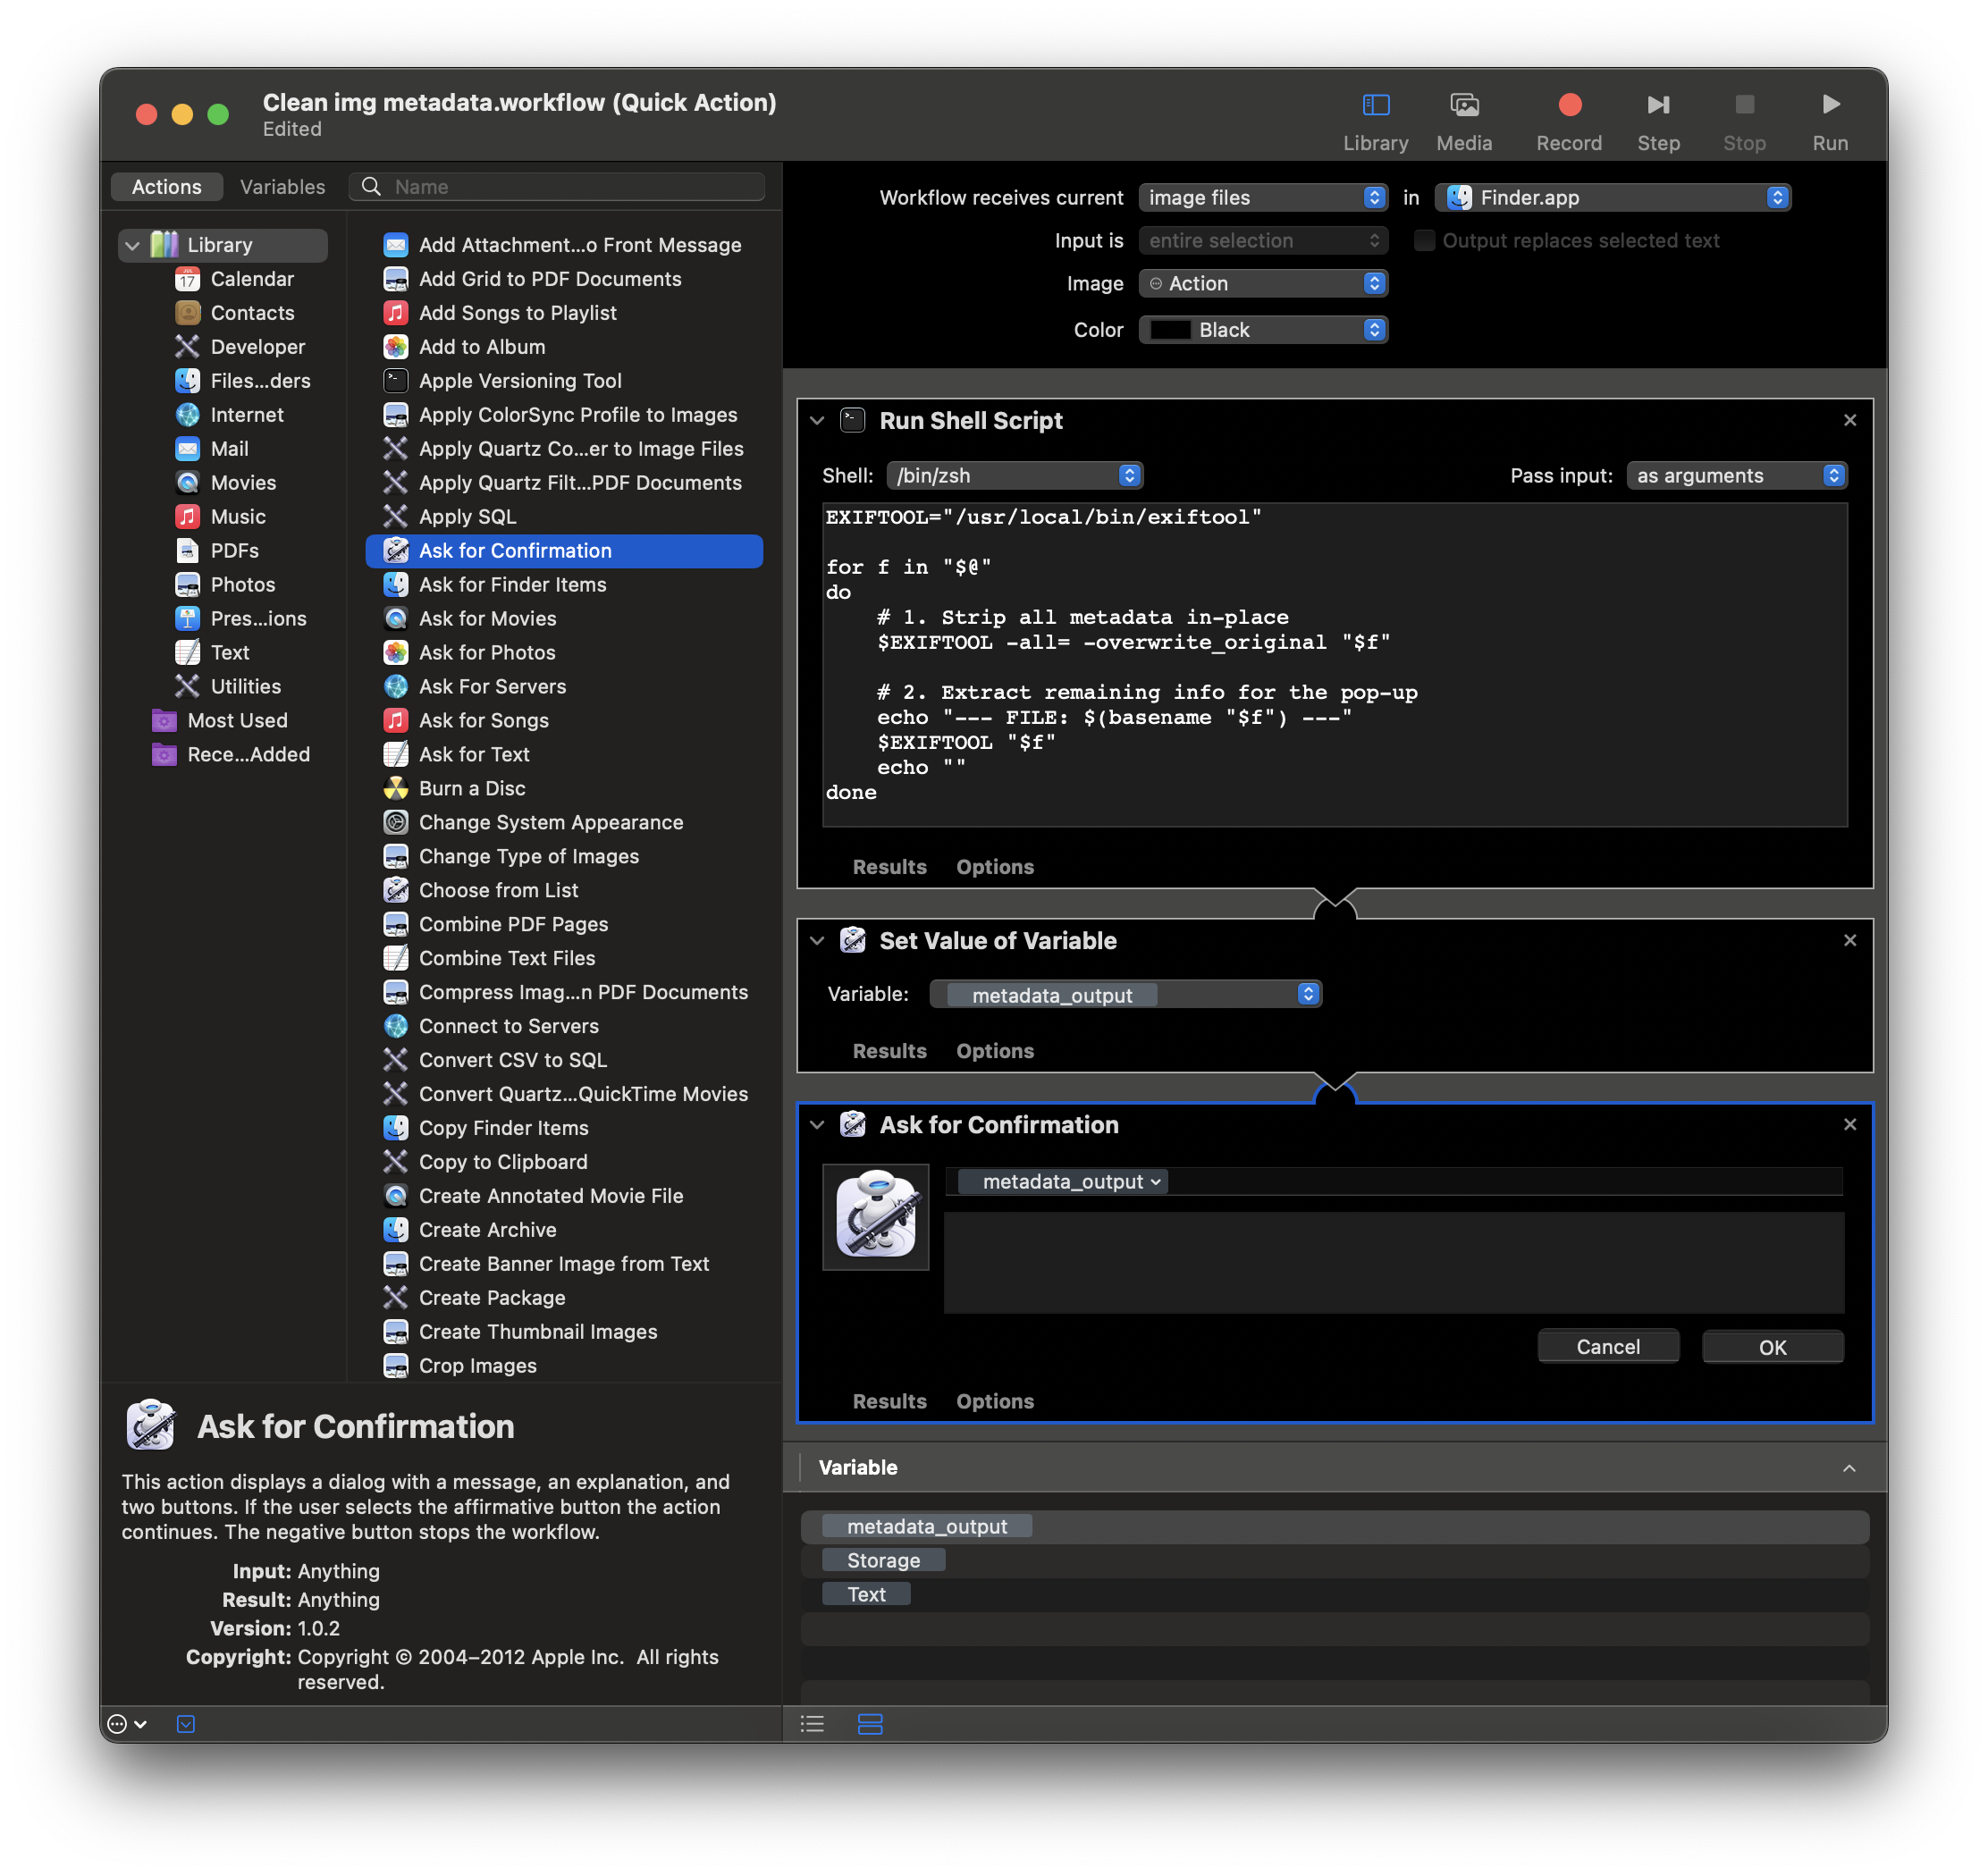
Now it should look like this:
Cmd + S to save the file.
Name it exactly what you want to see in your right-click menu, for example: Image Scrub
Test it:
- Go to any folder in Finder.
- Right-click an image that you already have a backup copy.
- Go to Quick Actions > Image Scrub
A dialog box will appear showing you the “cleaned” metadata (which should now only show basic file system properties like file size and format like below).
You can now upload this image to the internet without any concerns.
Note for HEIC files: HEIC images retain some structural metadata (such as color profile and codec parameters) that ExifTool cannot remove without corrupting the file. As a result, the popup window may extend beyond your screen borders due to the volume of remaining (non-sensitive) information. If that happens, simply press Enter or Esc to dismiss it instead of clicking the OK button.
A Little Bit More
You can find your saved Quick Action file that you created with Automator at this path: ~/Library/Services/
How to get there quickly:
- Open Finder.
- Press Cmd + Shift + G (Go to Folder).
- Paste
~/Library/Services/and hit Enter.
You will see a file named *.workflow.
If you ever want to change the name that appears in your right-click menu, simply rename the file inside that Services folder. To delete the Quick Action, just move that file to the Trash.